ERCP is a technically challenging procedure yet has become nearly universally available. Successful biliary cannulation and access should be possible in over 95% of cases whereas intended pancreatic duct cannulation rates are less frequently reported, but likely in the 85-95% range. Reasons for failed cannulation include endoscopist inexperience, post-operative anatomy and periampullary or ductal deformity due to tumor infiltration, diverticula, or other factors. When standard ERCP is unsuccessful, options include referral to a more experienced endoscopist, interventional radiologic techniques, surgical intervention or, more recently EUS-guided techniques (including rendezvous ERCP and direct transluminal drainage). The goal of this document is to discuss a few tips for performing successful EUS-guided rendezvous.
Tip #1: Are you the right person to be doing this?
An important aspect related to EUS-rendezvous is deciding when to offer this intervention. Rendezvous ERCP for purely diagnostic indications in inappropriate. Rendezvous should only be attempted after unsuccessful ERCP by an experienced endoscopist with documented high cannulation rates and skill with advanced cannulation techniques. EUS-rendezvous is one of the most technically complex endoscopic procedures and should only be offered by physicians with extensive experience in interventional EUS including more standard techniques such as pseudocyst drainage.
Tip #2: Start with biliary cases.
The easiest rendezvous cases are those with distal biliary obstruction as can be seen with ampullary adenocarcinoma, impacted stones or periampullary diverticulae. In these settings, the target duct is typically large and easily accessed with the needle. The more distal the point of obstruction, the easier it is to align the echoendoscope in a conducive orientation (see Tip #4).
Pancreatic rendezvous is technically more challenging and risky. The ducts are smaller caliber and typically have fibrotic walls.
Failed biliary cases can typically be successfully salvaged via interventional radiology. Percutaneous pancreatic ductal intervention, however, is rarely if ever performed by even highly experienced interventional radiologists.
Tip/Trick #3: Know your back-up plan.
The worst complications we have encountered following attempted EUS-rendezvous have occurred in the setting of unsuccessful drainage. This is particularly the case with pancreatic intervention. The decision to pursue EUS-guided ductal puncture is a commitment to persistence and completion of the case, whether by yourself or a radiologic colleague. It is important to have the support of an interventional radiologist who is available to assist in drainage immediately if you are unsuccessful. Puncture of an obstructed biliary system without expeditious drainage risks cholangitis, bile leakage and peritonitis. Unsuccessful EUS-guided biliary drainage requires either immediate EUS-guided transluminal drainage or urgent percutaneous intervention. Unsuccessful pancreatic drainage risks infection, leakage (with subsequent pseudocyst or pancreatic ascites) and pancreatitis, which may rarely be severe and necrotizing. Successful drainage may require multiple punctures, trial of multiple guidewires, repeated contrast injection or even direct transmural pancreaticogastrostomy. If drainage not achieved, there is often no alternative salvage approach and management is supportive (with IV hydration, pain management and antibiotics). It is unclear if pharmacologic treatments such as octreotide or rectal indomethacin have any role.
Tip #4: Take time to choose the optimal scope orientation and puncture site.
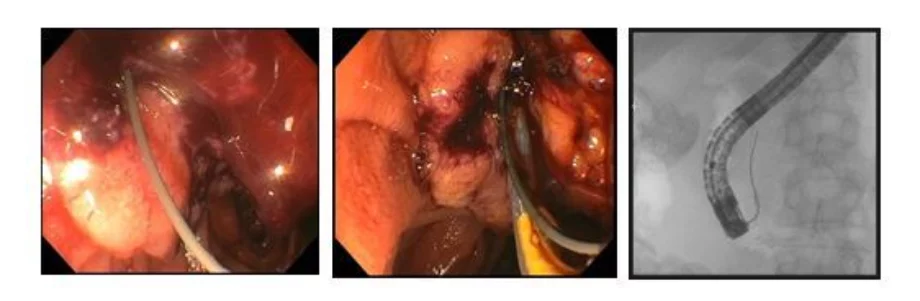
For biliary rendezvous, we prefer a transduodenal rather than transhepatic approach. For best orientation, the transducer should be in the apex of the duodenal bulb or proximal second portion with the scope in a “short” (lesser curvature) orientation (figure 1).

Tip #5: Know your needles and wires.
We prefer needles made of nitinol when possible. Steel needles may become permanently bent and curve out of the ultrasound imaging plane which can be problematic with small caliber ducts. When using 19-ga needles, we prefer 0.025 inch rather than 0.035 inch wires, loaded through a pre-flushed needle with a side-arm adaptor which allows injection of contrast around the wire. Smaller wires have less risk of shearing within the needle, and allow freer manipulation. With 22-ga needles, we use 0.018 in wires through pre-flushed needles, however this does not allow simultaneous contrast injection without removal of the wire from the needle. 25-ga needles can be used for rendezvous, but only with small (0.014 in) wires which are available for angiographic procedures.
Smaller ducts (particularly in the pancreas), may only initially be accessible with smaller needles. If the required smaller wire is not able to traverse the point of obstruction, the duct diameter can often be increased via the injection of contrast allowing repuncture with a larger 19-ga needle and larger wires.
In the US, all use of guidewires through EUS-needles is considered an “off label” use by the FDA. Nearly all currently available wires are produced with hydrophilic coatings and/or welded tips. It is EXTREMELY important to not forcefully withdraw a previously advanced guidewire from a needle which is already advanced through the bowel wall. The presence of resistance implies a risk of shearing of either the needle tip or hydrophilic coating, which may separate from the wire resulting in a retained foreign body. If a previously advanced guidewire needs to be withdrawn and resistance is encountered, it is best to fully withdraw the needle and repuncture the duct.
Tip #6: Be willing to puncture through the back wall of small caliber ducts.
This is particularly useful for small, fibrotic pancreatic ducts but also for decompressed bile ducts as may occur in the setting of bile leak. The duct wall may be firm and difficult to penetrate with the needle tip. Slow forward pressure of the needle tip against the near wall of a duct will compress the lumen and risk false wire passages along the outside of the duct wall or injection in the periductal space (see Tip #7). Puncture through both the near and far duct wall allow for more rapid, forceful (and thus more successful) duct penetration. Then a slow withdrawal of the needle will result in the far wall falling off of the needle tip while the near wall remains impinged on the needle and under traction, which opens the duct lumen for subsequent wire insertion.
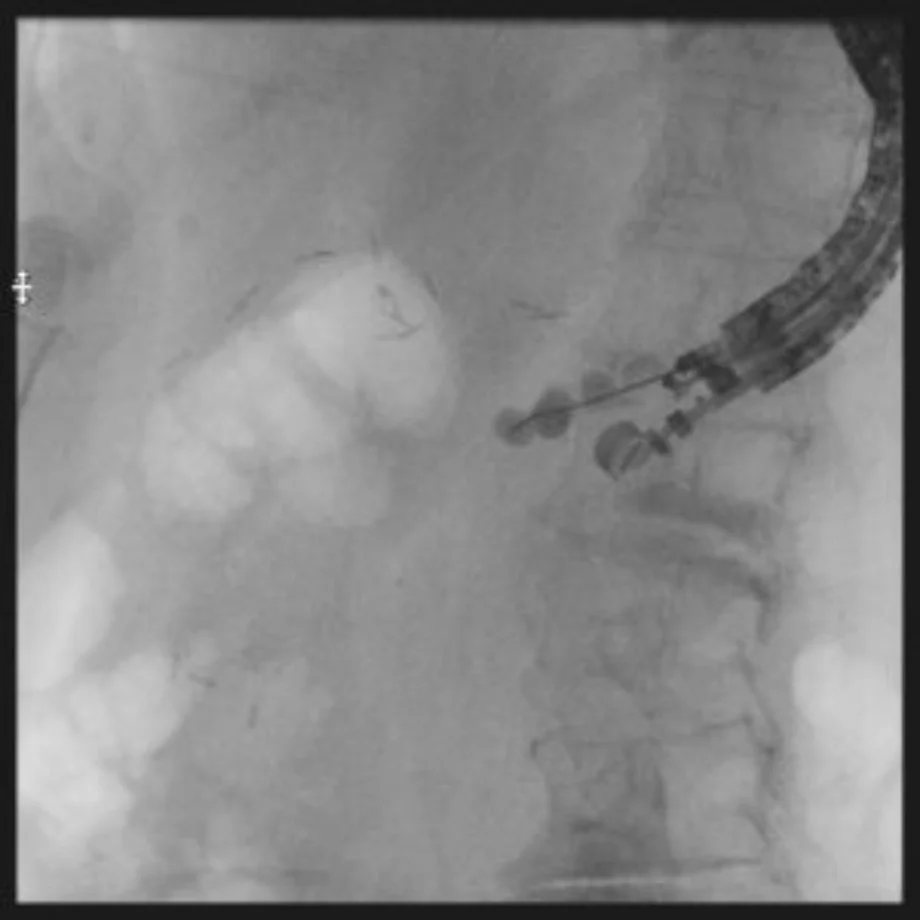
Tip #7: Limit contrast injection.
In our experience, contrast injection is often unnecessary and can interfere with success. Successful duct entry can typically be readily identified sonographically by visualizing the wire tip as it exits the needle. This, coupled with fluoroscopic monitoring is frequently sufficient to confirm successful wire location. Indiscriminate injection when the needle tip is not in the duct lumen leads to the introduction of contrast or air blebs which often interfere with subsequent ductal visualization. We typically reserve contrast injection for situations when a guidewire is clearly within the duct but not traversing the point of obstruction. In this case, the contrast can clarify that the wire is not in a sidebranch and also assist with directing the wire across the obstruction.
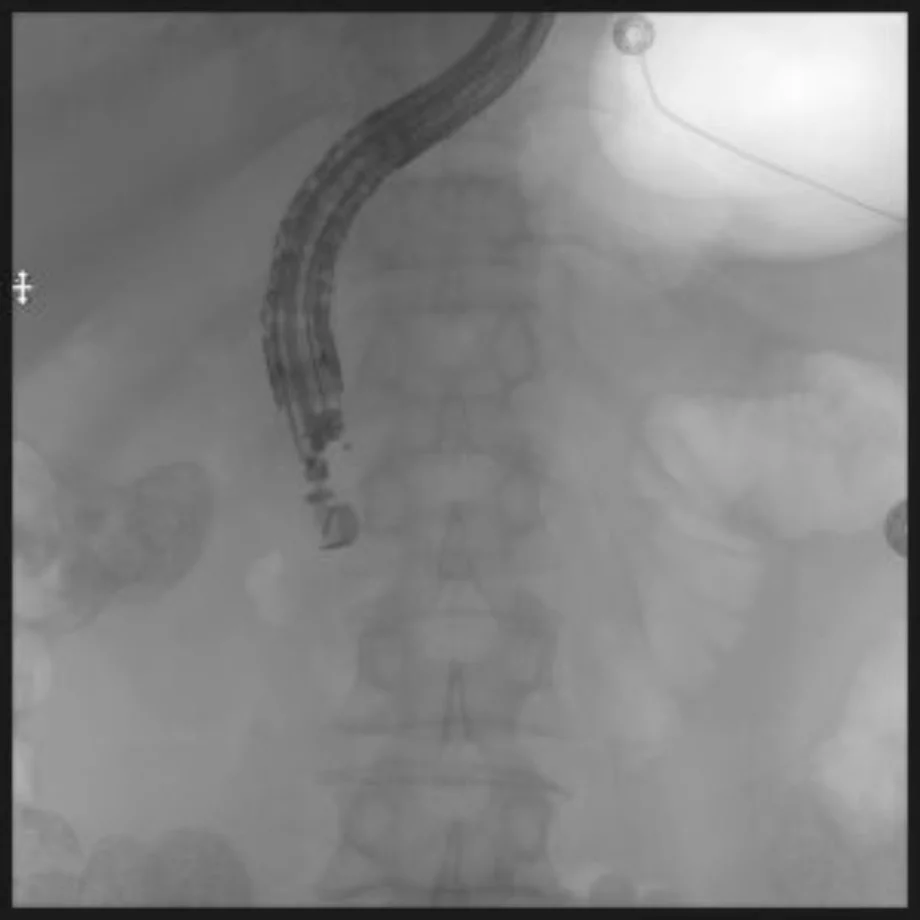
Tip #8: Leave as much wire as possible in the duodenal lumen.
It is important to leave a large amount of wire in the duodenal lumen or across a pancreatico- or biliary- jejunal anastomosis to prevent the wire from becoming dislodged during removal of the echoendoscope. Ideally at least two loops should be formed or, if the wire passes without looping, this should be advanced at least past the ligament of Treitz. Once the wire is in the desired location, the needle tip is withdrawn from the duct and the echoendoscope and attached needle are withdrawn by the endoscopist while an assistant advances wire. This is monitored fluoroscopically and care should be taken to avoid forming a large loop of wire in the gastric lumen. The endoscope shaft should be supported near the mouth to prevent the tip from falling towards the floor as it leaves the mouth, which would lead to the wire becoming dislodged. The wire is then removed from the endoscope, coiled and secured near the mouth.
Tip #9: Cannulate alongside the wire if possible.
In most cases, it will be possible to use the guidewire as a visual guide for cannulation with standard ERCP devices. The presence of a wire across the point of obstruction allows visualization of the correct angle for cannulation and the wire typically straightens and opens the obstruction allowing ready passage of a second wire (figures 4a, 4b and 4c).