Prevention and endoscopic management of colon perforations related to snare resection
February 28, 2018
Introduction
During the last 1-2 decades, we made substantial progress in our understanding of the mechanisms that lead to colon perforation during endoscopic resection of various types of polyps. In addition, development of a variety of endoscopic closure tools permit us to manage patients with large and complex colon polyps without surgery. This article focuses on tips and tricks required to prevent and manage colon perforations.
Tip 1: A clean colon is critical for endoluminal resection. In patients with a dirty colon preparation, escape of colon contents precipitates fecal peritonitis that may require a colostomy instead of simple closure. In contrast, the outcome of colon perforation is better in patients who undergo colon EMR or ESD in the setting of a clean preparation.
Tip 2: Routine use of CO2 instead of air for colonoscopy reduces the risk of procedure-related pain as well minimizing the risk of tension pneumoperitoneum if a perforation were to occur.
Tip 3: Use of a distal attachment (cap) to the endoscope facilitates EMR as well as in clip closure of defects. The cap is useful in deflecting previously placed clips to approach the site for clip application better.
Tip 4: Keep the lesion in the non-dependent position by repositioning the patient if necessary so that fluid pools away from the lesion; this will prevent escape of fluid if a perforation were to occur and also facilitates easy identification of a bleeding vessel if hemorrhage were to occur. Keep the field dry by suctioning fluid before and during resection.
Tip 5: Submucosal injection of normal saline, a colloid, or high viscosity agents (hyaluronic acid or glycerol) reduces the risk of snare entrapment of muscularis propria and prevents deep thermal injury and perforation. Use of a contrast dye (indigo carmine or methylene blue) within the injectate helps to identify the depth of injury – Indigo Carmine or Methylene Blue binds avidly to the submucosal tissue but does not stain the muscularis propria, thereby allowing any exposed muscle to be easily seen as white on a blue background.
Tip 6: Use of microprocessor-controlled electrosurgical generators sense tissue impedance and adjust power accordingly to avoid deep tissue injury.(VIO 300D; ERBE, Tubingen, Germany. ESG100; Olympus Medical, Tokyo, Japan).
Tip 7: Thin wired snares (<0.4 mm monofilament snares) allow swifter tissue transection and thereby limit unintentional thermal injury to the colonic wall compared with polyfilament wire.
Tip 8: Keep the snare parallel to the wall; this will avoid entrapment of muscle, especially in polyps across a fold.
Tip 9: Choose a smaller snare when resecting polyps in difficult to access areas; if a perforation were to happen, it will be small and can be managed easily.
Tip 10: Check entrapment of muscle in the snare by free mobility of the ensnared tissue relative to the colonic wall, ability to close the snare fully with a distance of <1 cm between thumb and fingers, and a quick cut (usually 1-3 pulses). Whenever the muscularis propria is entrapped in the snare, the mobility sign can be absent and in such cases, the snare can be loosened slightly, along with tenting it up to let the muscle layer fall out of the snare. Excessive cautery close to the muscle should be avoided as this predisposes to delayed perforation.
Tip 11: When in doubt use a cut current by tapping the yellow pedal to avoid the risk of deep injury from coagulation and delayed perforation. Bleeding during the procedure can be easily controlled.
Tip 12: Check the site after each cut and document the depth of resection by freezing the frame and taking a few seconds to observe the resection site before going to the next step.
Tip 13: Learn to identify the depth resection – intact blue lacey submucosa indicates the remaining colon wall is strong and is unlikely to develop delayed perforation; any injury to the muscularis propria is at risk for delayed perforation and needs reinforcement of the colon wall with clips.
Tip 14: If perforation was observed, check for signs of tension pneumoperitoneum (tense abdomen, rapid heart rate, drop in blood pressure and pulse oximetry). Tension pneumoperitoneum can be easily treated by a wide bore needle decompression of the peritoneal cavity. Then the perforation can be closed.
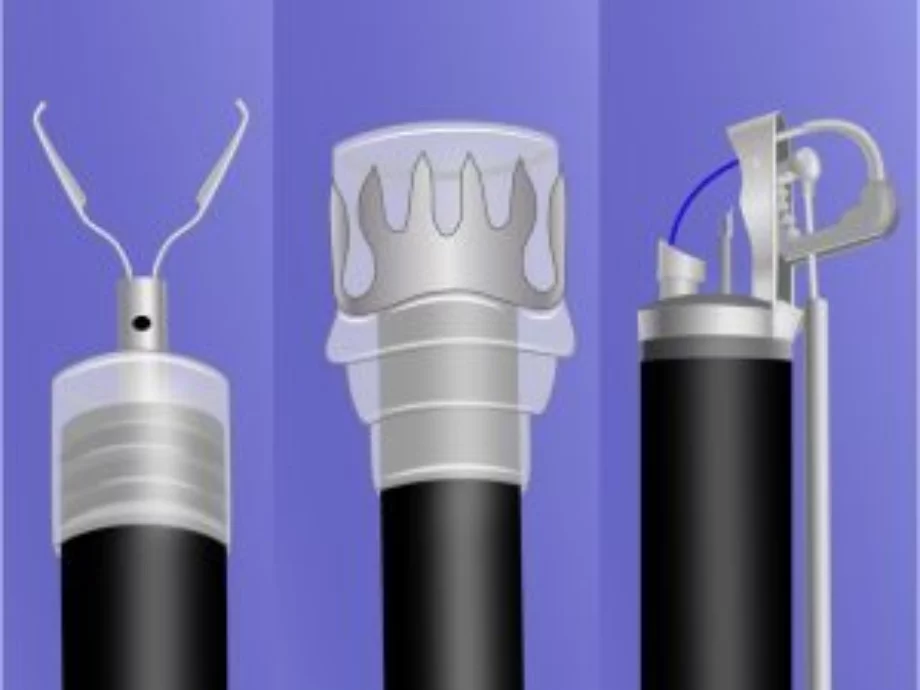
Tip 15: Learn how to use different closure devices (Figure 1). Through the scope clip devices can be deployed immediately after recognition of the perforation without the need to remove the endoscope, while over-the-scope clip and suture devices require the endoscope to be removed from the field to get loaded with the device. This could lead to spillage of colon contents into the peritoneal cavity.
Tip 16: If a perforation was observed, avoid spillage of colon contents by closing the defect promptly with clips. This may require keeping a couple of clips ready (out of their packets) especially during high risk resections.
Tip 17: Through the scope clips allow for rapid deployment and prompt closure of the colon perforation, without the need to remove the endoscope to load an over-the-scope clip or over-the-scope suturing device. Hence, through the scope clips are preferred for closure.
Tip 18: Start closure with clips slightly away from the edge of the perforation to allow it to tent the edges. Apply clips at close quarters.
Tip 19: Clip blades retract on closure, hence one needs to compensate for that retraction of clip blades by either gently pushing the endoscope or clip catheter forwards while slowly closing the clip.
Tip 20: A deep approximation of the edges of the perforation with clips with no visible space between the blades of the clips is critical for a leak proof sealing.
Tip 21: If a deep approximation of the edges with clip application is not possible, then consider applying additional clips on either side of that clip to achieve deep approximation of the edges of perforation.
Tip 22: Take photographs on both sides of the closure – both front side and back side, because sometimes the clip may slip and hang on just one edge. Take multiple photographs.
Tip 23: Decompress the colon after clip closure of perforation; avoid the temptation of examining the rest of the colon as clip closure can get easily disrupted with bowel distention required for colon examination.
Tip 24: Admit the patient for observation, start broad-spectrum antibiotics, confirm closure with a contrast CT, and work closely with surgical colleagues in managing the patient.
Tip 25: Techniques for clip closure of large EMR defects and perforation follow similar principles. I am enclosing a link to clip closure of large EMR defects and perforations to assist further. https://www.youtube.com/playlist?list=PLCB2205662981634C
References: